Internal Wall Insulation

Internal wall insulation (IWI) has many benefits including reduced heat loss, temperature moderation in summer, and potentially even improved indoor air quality. But it also comes with some risks so it’s important to choose the correct materials and finishes.
Benefits and drawbacks of IWI
-
IWI doesn’t affect the external appearance of the house so is often preferable to external wall insulation where the home has attractive design features.
-
Unlike external wall insulation, IWI will require you to vacate the room temporarily and redecorate afterwards, meaning it’s more disruptive.
-
Because the wall is outside the insulation, the brickwork no longer benefits from the heating/drying effect of the home’s heating. This can cause a moisture risk which needs to be mitigate by suitable choice of insulation and finishes.
-
Insulating a whole house with IWI is likely to be more expensive that EWI (and much more expensive than cavity insulation) because of the need to redecorate each room. But if you phase the installation as the rooms are redecorated then the additional cost is comparable with EWI.
-
Unlike external or cavity wall insulation, IWI will reduce the floor area of the room slightly. A typical IWI system might be 100mm thick so you will lose a small amount of floor area.
Managing moisture risk
The main risk with IWI is that it could cause or worsen dampness in the wall. There are two main sources of damp risk:
Rain penetration
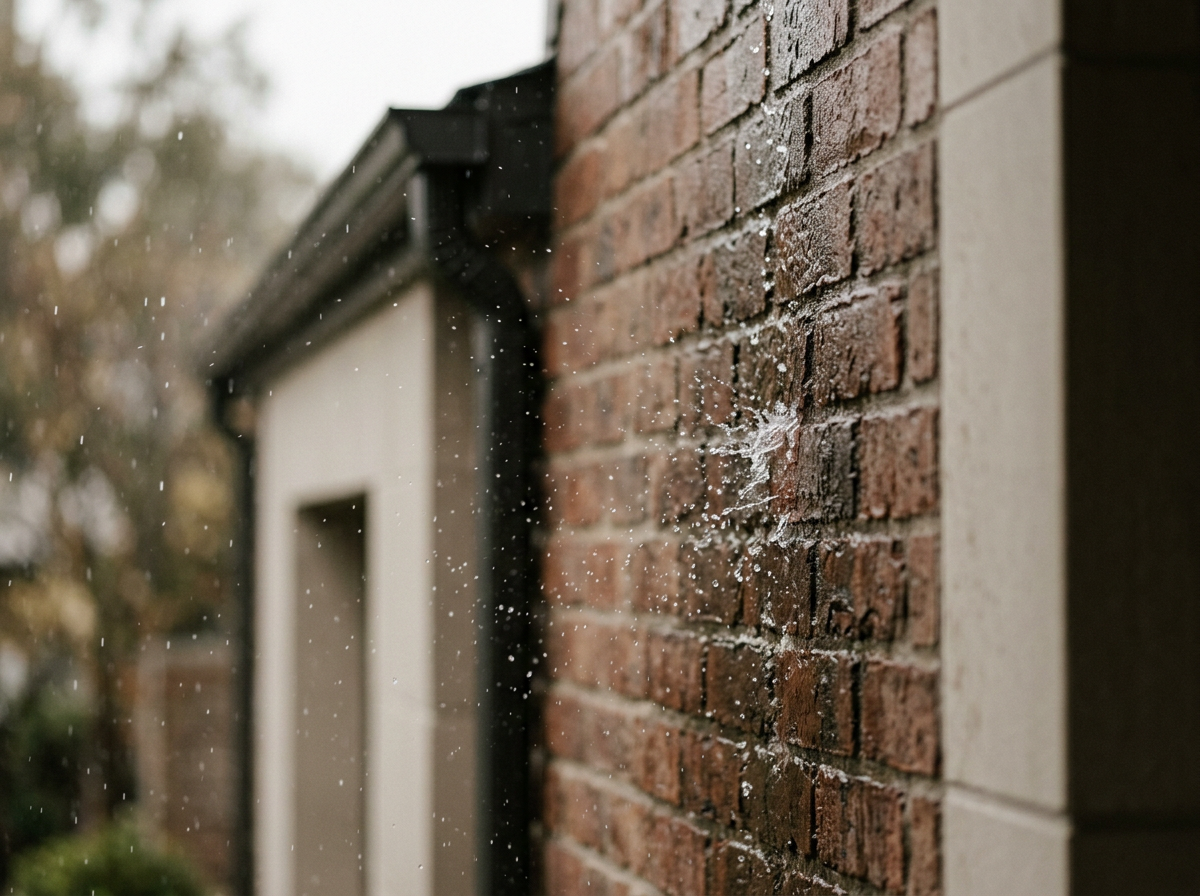
As described elsewhere on the site, historic brick walls absorb some water when it rains. They are designed such that the water can re-evaporate from both faces - both outside and inside. Adding impermeable insulation inside the wall can disrupt the drying process, in some cases leading to damp accumulation.
Condensation
The other potential source of dampness is humidity inside the home. Breathing, washing and laundry all create water vapour which increases humidity. When this water vapour hits a cold surface it condenses into liquid water. If humid air gets behind a layer of internal wall insulation it can condense on the cold bricks, causing water accumulation.
Designing to prevent damp
To manage the risk of dampness we need to address both rain penetration and condensation risk.
IWI isn’t recommended for walls exposed to high levels of wind-driven rain. If your wall is located in zones 3 or 4 on the exposure map you might want to consider external insulation instead, or adding protective render or cladding.
Breathable insulation materials (by which we mean those that are “vapour-open” - with lower resistance to water vapour) are preferred because they are better at drying-out. Woodfibre is particularly good because it’s both breathable and “capillary active” meaning water actively spreads to help natural drying.
Membranes can reduce air leakage and (theoretically) prevent water vapour entering the insulation. However, this relies on them being perfectly sealed which is often difficult, especially at the junctions with the floor and ceiling. In practice, membranes are often only partially effective and can compromise the ability of the structure to dry out during warmer weather. Our advice is to use membranes only if recommended by the manufacturer of your chosen insulation system.
With IWI, moisture risk increases with thickness because the wall gets progressively colder as the insulation increases. For historic single-leaf brick walls, 60mm of woodfibre is typically recommended as the upper limit. This won’t quite achieve the Building Regulations recommended U-value of 0.3 but is recognised to be a good balance between thermal effectiveness and moisture risk.
Any voids will pump air in and out during heating and cooling as the air expands and contracts. Minimising the volume of voids (e.g. by bonding insulation directly to the wall rather than mounting on top of timber battens) is therefore preferred.
IWI Materials
Woodfibre
We believe woodfibre to be the best overall material for internal wall insulation. It’s vapour-open (breathable), capillary active (moisture-wicking) and hygroscopic (humidity regulating). This means it’s good at drying-out if it gets wet, but can also help to improve indoor air quality. It’s a natural, renewable material (produced from timber industry waste) so it’s also environmentally friendly.
Woodfibre is among the more expensive of insulation products though. A typical 60mm thick woodfibre insulation board will start at around £20 per square metre but you will also need to factor-in the cost of specialist plasters because most manufacturers recommend lime plaster for its improved moisture-handling and mould resistance. Lime plastering is a specialist job and there’s a shortage of tradesmen with the skill to use it so be sure to check with your builders before they start.
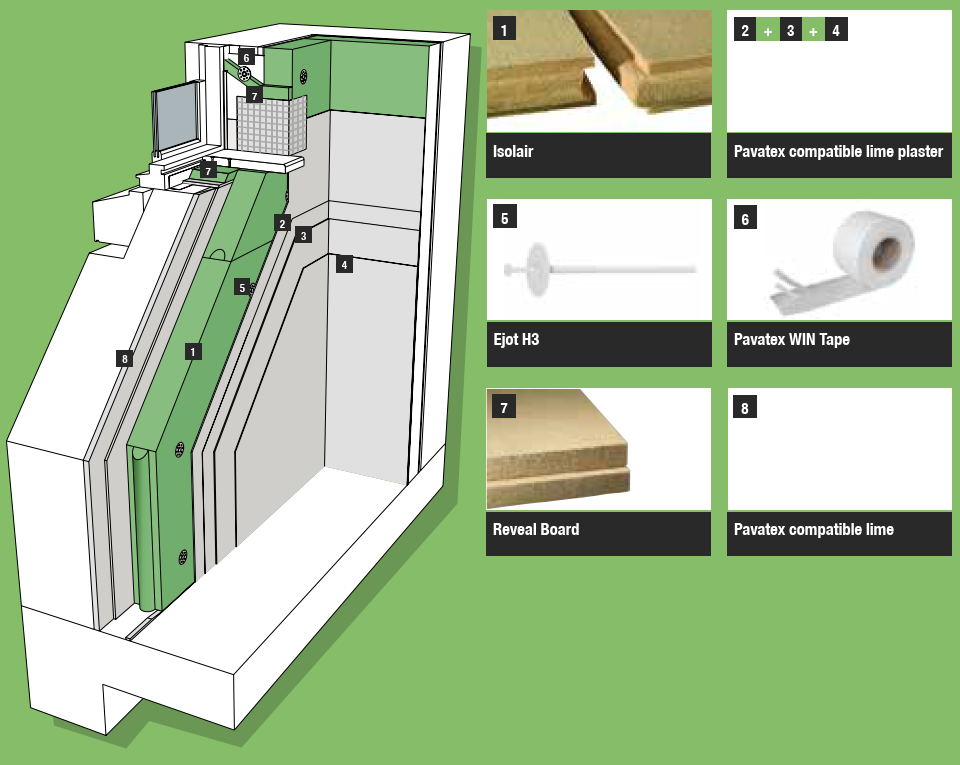
Recommended installation for Pavatex “Isolair” woodfibre IWI. Note the use of lime plaster which is more moisture-tolerant than gypsum plaster. The window reveal boards are essential to avoid cold bridges which could lead to condensation and mould growth around the window.
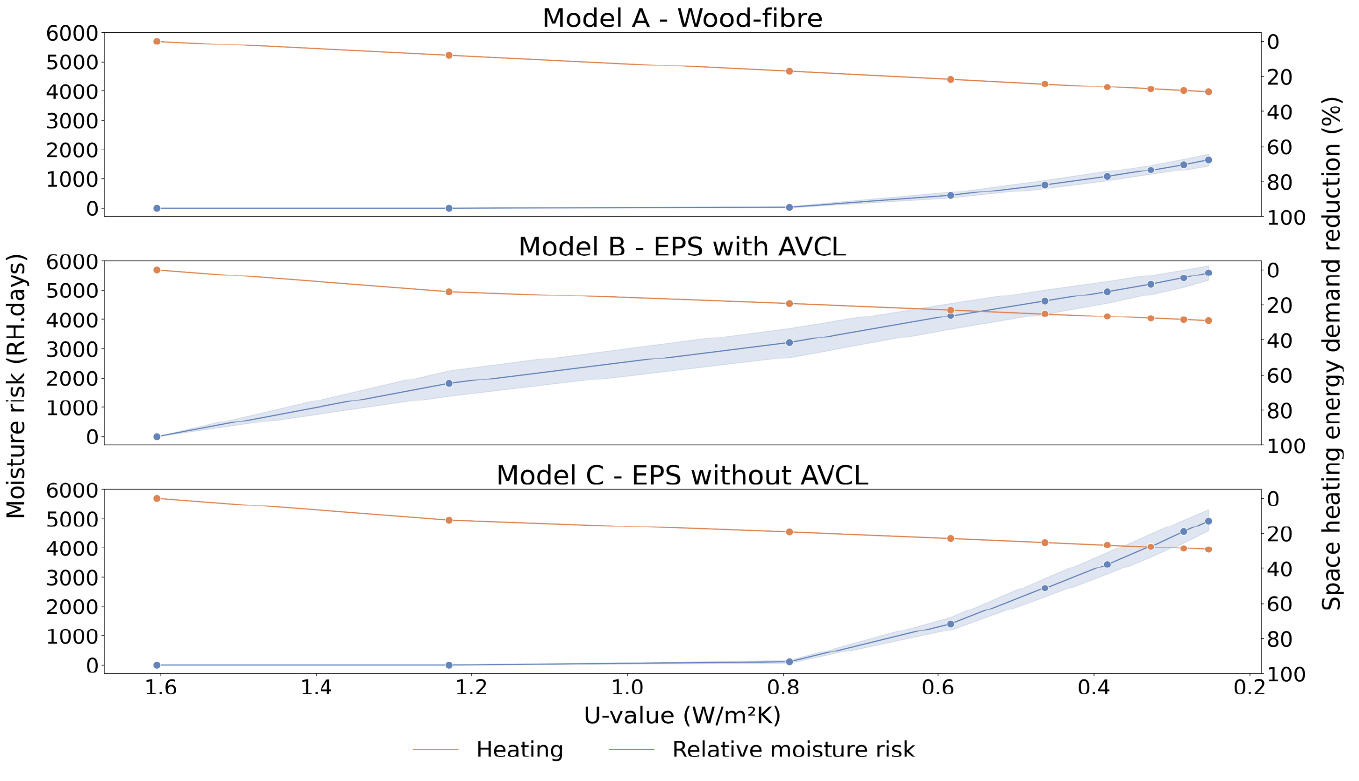
Relative moisture risk between woodfibre insulation (top graph) and foam insulation without a vapour membrane (middle graph) and with a vapour membrane (bottom graph). As you can see, there is almost no increase in moisture risk for woodfibre down to a U-value of 0.8. Beyond that, the risk climbs gradually but remains lower than the foam insulation.
Source: Demonstration of Energy Efficiency Potential (DEEP) research report 6.03 “Moisture risk from internal wall insulation (IWI)”
Woodfibre insulation is also available in flexible format (e.g. Pavaflex, Steico Flex) which can be installed between timber battens before dry-lining. This method avoids the need for lime plastering but will reduce the humidity-regulating benefit of the woodfibre because plasterboard isn’t hygroscopic.

“Friction fit” of semi-rigid wood fibre installation between timber battens
Mineral Wool
Mineral wool such as Rockwool is also “vapour-open” making it another candidate for use with historic brickwork. It’s cheaper than woodfibre, but it lacks some of woodfibre’s beneficial properties.
Mineral wool is typically installed between timber battens as shown in our step-by-step example wool insulation between battens.

Foam Boards
Rigid foam boards such as polyisocyanurate (PIR) or expanded polystyrene (EPS) are by the most commonly used type of insulation in the UK. They are cheap, effective and don’t require any specialist skills to install.
The most common form of insulation for this approach is rigid foil-faced PIR boards of 60-80mm thickness . These are impermeable to water and the foil acts as a vapour barrier. The joints between the panels and around any openings should be sealed with aluminium tape to complete the airtight seal.
You will also need to seal the junctions to the ceiling and floor. This is difficult to do in practice and makes complete airtightness unrealistic in our opinion. This is why we tend to advise against foam insulation for IWI - any air leakage can lead to condensation behind the insulation. Because the boards are resistant to water vapour, the condensation has no way to re-evaporate, risking fungal growth and rotting of timber joists and floorboards.
The foam panels are often mounted on top of or between timber battens, with plasterboard fixed on top, and finished with a thin "skim" coat of plaster before painting or wallpapering. A popular alternative is direct fixing where the insulation is essentially glued to the wall with adhesive. This method is commonly known as "dot and dab".
Insulation boards are also available with plasterboard pre-fixed to the internal face saving the need for a second step fixing separate plasterboard. If your existing wall is dry and even, direct gluing of insulated plasterboard is a very quick and easy way to add insulation. If the wall isn’t flat then it’s advisable to mount the boards onto a frame of timber battens which can smooth out any irregularities.

Internal Wall Insulation Detailing
Whichever approach you use you will need to remove anything attached to the walls – electrical sockets, light switches, curtain rails, radiators, pipes, skirtings, covings, kitchen cabinets, fitted wardrobes, etc. These will need re-fixing to the finished insulated wall. This could be a good opportunity to move any radiators away from their traditional position under windows onto internal walls. Not only will this reduce the amount of heat the radiator loses through the external wall but it will also allow you to hang full-length insulating curtains over the windows, potentially saving the cost of a window upgrade.
Electrical cables and any pipes will need to be accommodated somewhere in the new wall. If you aren’t moving the electrical fixings then you may be able to leave the cables and pipes embedded where they are and simply drill small holes in the insulation for them to poke through (don't forget to seal the holes afterwards to maintain airtightness). If you need to move the services, you may need to carve out new channels in the existing plaster wall before fixing the insulation. An alternative is to use timber battens that are slightly deeper than the insulation system, leaving a small 'service void' between the insulation and the plasterboard. Notches can be cut in the battens to allow the services to cross over.

Window reveal detail with thin layer of Aerogel insulation to prevent thermal bridges (image credit – Proctor Group)

Floor void insulation – worth considering to reduce thermal bridging which could reduce the effectiveness of the insulation and lead to condensation
(image credit - www.greenspec.co.uk)
Window openings must also be insulated to avoid thermal bridges causing condensation. The thickness of most insulation systems makes them unsuitable for window reveals (they would be deeper than the window frame) so special materials may be required in this area. High-tech Aerogel insulation (marketed as SpaceTherm) is available pre-bonded to thin sheets of magnesium oxide board which can be plastered directly. The thinnest combined system is only 13mm thick and sells for approximately £100 per square metre. This wouldn't achieve the required U-value for an entire wall but would be perfect around a window frame which might otherwise be impossible to insulate without replacing the window.
Finally, an area which is often neglected during insulation projects is the floorspace. If you don't insulate the wall between the ceiling and the floor this will become a cold bridge, potentially causing condensation and rotting of the timber floor joists in the long-term. The only way to insulate this area is to lift or cut the floorboards along the wall and insert insulation in the gap. The easiest way to do this is to stuff some flexible mineral wool insulation into the gap against the wall. A more thorough method would be to plaster the wall for airtightness and insert sheets of calcium silicate board insulation (e.g. Calistherm) which has excellent moisture-control and anti-mould properties.
Tool Kit
Links connect to suitable products on external sites. Please contact us if you notice any broken links.


